
Know Every Part of Your TIG Torch Before You Replace It
Before replacing a part, match the exact torch model, cooling type, consumable family, tungsten diameter, threads, cables, connector, and rating.
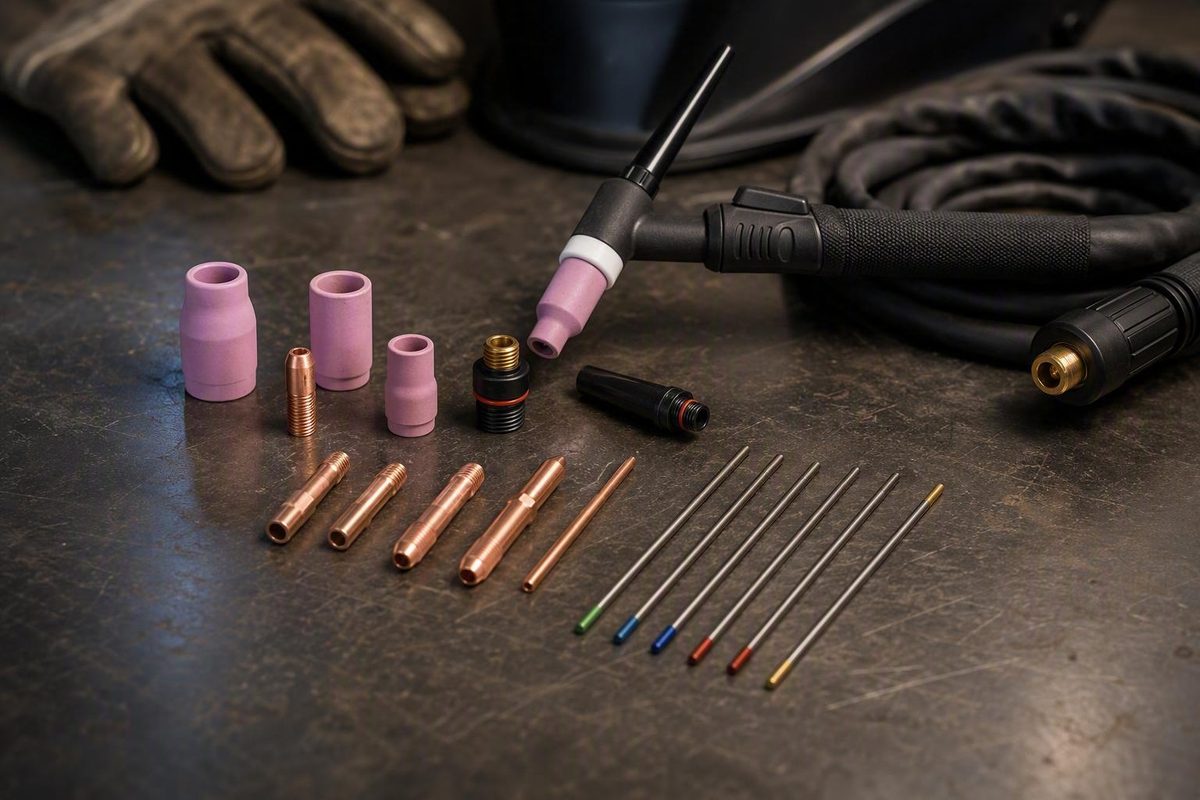
A TIG torch is a matched system that carries welding current, grips the tungsten, delivers shielding gas, manages heat, and connects any operator controls to the power source. Before replacing TIG torch components, identify the exact torch model and match its cooling type, consumable family, tungsten diameter, threads, cable arrangement, machine connector, amperage rating, and duty cycle. Similar appearance—or a familiar family label—is not proof that a part fits.
TIG torch parts at a glance
Think of an exploded TIG torch as five connected groups:
- Front-end parts and consumables: cup, tungsten, collet, collet body or gas-lens body, insulator, seals, and back cap.
- Torch hardware: head or body, neck, and handle.
- Rear cables and hoses: power cable, shielding-gas hose, and, on water-cooled models, coolant supply and return hoses.
- Controls: trigger, start switch, fingertip amperage control, gas valve, or another model-specific control.
- Machine-side connections: power adapter, gas fitting, control plug, and cooler connections where required.
A useful linear view is:
Back cap → tungsten and collet → collet body or gas-lens body → insulator or gasket → cup → torch head → handle → cables and hoses → machine connections
The tungsten runs through the center of the front-end assembly. The cup surrounds its working end, while the back cap closes the rear and applies the clamping force that holds the electrode.
The conventional core assembly includes the torch head or body, handle, tungsten electrode, collet, collet body, cup or nozzle, back cap, insulator and seals, power cable, and gas hose. The head supports the front-end components, conducts current, routes shielding gas, and helps dissipate heat. The tungsten carries current and establishes the arc, while the cup directs shielding gas around the electrode and weld pool. This arrangement is illustrated in Miller’s overview of an electric TIG torch.
| Part | Function | Typical status | First compatibility check |
|---|---|---|---|
| Torch head or body | Supports the front end, carries current, routes gas, and removes heat | Durable hardware | Exact model and cooling type |
| Handle | Provides grip and insulation; may support controls | Durable hardware | Head, cable, and control configuration |
| Tungsten electrode | Carries current and establishes the arc | Routinely replaced | Diameter and power-source guidance |
| Collet | Clamps the tungsten | Routinely replaced | Tungsten diameter and torch family |
| Collet body | Holds the collet, conducts current, and routes gas | Service part | Family, diameter, and thread |
| Gas-lens body | Replaces the standard body in a matched gas-lens setup | Service or conversion part | Complete front-end configuration |
| Cup or nozzle | Directs shielding gas around the electrode and weld pool | Routinely replaced | Body type, thread, and access |
| Back cap | Compresses the collet and encloses the rear electrode | Consumable or service part | Model, thread, and cap length |
| Insulator | Separates and positions front-end components | Replace when damaged | Standard or gas-lens setup |
| O-rings and seals | Limit gas or coolant leakage | Routinely replaced | Material, dimensions, and model |
| Power cable | Carries current from the power source | Service part | Rating, length, fitting, and cable type |
| Gas hose | Supplies shielding gas | Service part | Torch arrangement and connection |
| Coolant hoses | Carry coolant to and from a water-cooled torch | Service part | Torch and cooler specifications |
| Trigger or remote | Starts the arc or adjusts output where supported | Model-specific option | Electrical interface and power source |
| Machine adapter | Joins power, gas, and sometimes coolant connections | Connection component | Exact terminal and fittings |
“Non-consumable electrode” describes tungsten’s role in GTAW: it is not intentionally melted and deposited as filler metal. It remains a replaceable shop item because it can erode, split, become contaminated, or be ground too short for further use.
Cups, collets, tungsten, O-rings, and other seals are routinely replaced. Collet bodies, cables, hoses, and switches are generally service parts. Replacement depends on heat exposure, contamination, flexing, leakage, thread damage, impact, and actual use.
How the front end holds the tungsten and delivers shielding gas
The front end performs two jobs at once: it creates a secure electrical path to the tungsten and provides a controlled route for shielding gas.
In a standard assembly, the collet sits inside the collet body, and the tungsten passes through both. Tightening the back cap forces the collet into the body’s tapered seat, compressing it around the electrode. Loosening the cap releases that grip so the tungsten can be repositioned or removed.
The tungsten, collet, and collet body or gas-lens body must match by electrode diameter. A collet that is too large may not grip reliably. A smaller component will not accept the electrode correctly and must not be forced.
A standard collet body conducts current into the collet and tungsten while routing shielding gas through openings toward the cup. The cup surrounds the electrode and directs gas over the arc and weld pool. Cup diameter and length influence joint access, visibility, and shielding coverage, but no single cup size or tungsten extension suits every weld.
A gas-lens body adds screens that condition the gas stream before it leaves the cup. It is not a universal one-part upgrade. Conversion may require a compatible gas-lens body, collet, cup, insulator or gasket, and back-cap arrangement for the specific torch.
| Check | Standard collet-body setup | Gas-lens setup |
|---|---|---|
| Parts required | Body, matching collet, standard cup, insulator, back cap | Lens body, matching collet, compatible cup, insulator or gasket, back cap |
| Gas-flow design | Gas passes through body openings into the cup | Screens condition gas before it exits the cup |
| Access implications | Often compact and straightforward | Lens and cup geometry may change front-end dimensions |
| Compatibility checks | Model, diameter, body thread, cup thread | Standard checks plus lens, cup, and insulator compatibility |
Back-cap length changes how the torch fits into a joint. A short cap improves rear clearance but limits the electrode length that can be enclosed. Medium and long caps permit more electrode-length adjustment but need additional room behind the head. Lincoln’s LTP manual confirms that back-cap type determines maximum usable electrode length.
Use a compact front-end arrangement intended for that torch.
Compatibility checklist: identify before you order
Start with the exact model stamped on the torch, printed on its label or packaging, or confirmed in the current manufacturer manual. Compare dimensions and connections with the manufacturer or an authorized supplier rather than guessing from a photograph.
Use this decision order:
- Exact torch model
- Air- or water-cooled construction
- Torch and consumable family
- Tungsten diameter
- Standard collet body or gas-lens configuration
- Cup, body, insulator, and back-cap threads
- One-piece or two-piece cable arrangement
- Machine-side power fitting or adapter
- Gas connection
- Control lead or remote interface
- Rated amperage and duty cycle
- Cooler and coolant requirements, if applicable
The 9/20 and 17/18/26 designations are common consumable-family groupings. A 9- or 20-style torch generally uses a different front-end family from a 17-, 18-, or 26-style torch. Even within a grouping, the family name does not establish fit across every brand, revision, specialty head, or aftermarket system. Lincoln, for example, publishes separate expendable categories for 9/20 and 17/18/26 families.
| Common grouping | Associated components | What it suggests | Mandatory verification |
|---|---|---|---|
| 9/20 family | Collets, bodies, lenses, cups, insulators, and back caps marketed for 9/20-style torches | A shared general front-end size class | Exact model, documentation, electrode diameter, and threads |
| 17/18/26 family | Collets, bodies, lenses, cups, insulators, and back caps marketed for 17/18/26-style torches | A different general front-end size class | Exact model, documentation, electrode diameter, and threads |
For a 3/32-inch tungsten, choose a 3/32-inch collet and a matching standard collet body or gas-lens body made for the exact torch family. Then confirm that the cup and insulator belong to that front-end configuration. Manufacturer instructions require the tungsten, collet, and body to have matching diameters.
Cable construction also matters. In a one-piece cable, the power conductor is located inside a hose. A two-piece arrangement separates the power conductor and gas hose. Connection hardware can differ between these designs, so verify the cable end, adapter, and power-source terminal. Lincoln’s Pro-Torch literature shows how cable arrangement, adapter, torch model, and terminal affect selection.
Do not assume that visually similar parts marked WP, PTA, PTW, LA, LTP, CK, TL, or HW interchange. Those labels may refer to different brands, lines, heads, cable systems, or connection standards.
Air-cooled and water-cooled torch systems
Cooling type affects more than the torch head. It changes the cable assembly, supporting equipment, portability, maintenance requirements, and usable welding load.
| Factor | Air-cooled system | Water-cooled system |
|---|---|---|
| Heat removal | Ambient air, shielding gas, and conductive components | Coolant circulated through the torch and cable |
| Cables and hoses | Power cable and gas path; generally more copper | Power and gas paths plus coolant supply and return |
| Supporting equipment | No separate cooler | Compatible cooler or specified coolant system |
| Portability | Simpler to transport | More equipment and connections |
| Maintenance | Fewer hoses and fittings | Cooler, coolant, hoses, seals, and leak checks |
| Typical application | Mobile, intermittent, or moderate-load work | Sustained or higher-amperage shop work |
| Rating decision | Verify model amperage and duty cycle | Verify rating, duty cycle, and cooler capacity |
Air-cooled torches release heat through ambient air and shielding gas. They generally use more copper in the power cable to manage electrical and thermal load, which can make the cable heavier and less flexible. Without a cooler or coolant hoses, the system is usually easier to assemble, move, and maintain.
A water-cooled system circulates coolant through the torch and along the cable assembly. This permits a lighter torch-side cable arrangement but adds a cooler, coolant supply and return paths, fittings, and potential leak points. Water-cooled systems commonly suit sustained or higher-amperage shop work, while air-cooled systems often make more sense where portability and simplicity matter.
Duty cycle is the percentage of a 10-minute period during which a torch can operate at its specified output without overloading. Amperage and duty cycle must be evaluated together; a torch rated at a given amperage at 60% duty cycle does not have the same sustained capacity as one rated at that amperage at 100%. Miller explains both the cooling differences and the 10-minute duty-cycle basis.
Do not replace the exact model rating with a broad rule such as “air-cooled below this amperage” or “water-cooled above that amperage.” Model ratings and operating conditions differ.
Never operate a water-cooled torch without the circulation required by its manufacturer. Use the specified coolant, verify circulation before welding, and stop if flow is lost or leakage appears. Return the system to service only after the cause has been corrected under the torch and cooler instructions.
General assembly and pre-use inspection
Before assembly or service, isolate input power and shut off the shielding-gas supply. Follow the current manuals for the torch, power source, and cooler. If a manual reserves installation, maintenance, or repair for qualified personnel, that restriction overrides this overview. Lincoln’s operating guidance requires input power to be disconnected before work on electrically powered equipment.
A general front-end sequence is:
- Install the matching standard collet body or gas-lens body in the torch head.
- Insert the correctly sized collet.
- Insert the tungsten through the assembly.
- Fit and tighten the back cap until the collet grips the electrode.
- Install the compatible cup.
- Confirm the power, gas, control, and coolant connections.
- Restore the required supplies and verify gas flow and, where applicable, coolant circulation.
Some designs use a different order or incorporate separate gaskets, sleeves, or insulators. Never force a thread that does not start cleanly by hand.
Inspect the torch at the intervals specified by its manual and whenever components are changed, damage is suspected, or performance changes:
- Cup: Look for cracks, chips, heavy contamination, and damaged threads.
- Collet: Check for distortion, burned surfaces, split damage, and loss of grip.
- Collet body or gas lens: Keep gas passages clean and inspect threads and screens.
- O-rings and seals: Replace cut, flattened, hardened, or missing pieces.
- Insulator: Confirm correct seating and check for cracks or heat damage.
- Tungsten: Make sure it is clean, securely held, and prepared for the equipment and application.
- Handle and head: Check for looseness, impact damage, exposed conductors, and leakage.
- Power cable: Inspect insulation and confirm that terminals are secure.
- Gas hose and fittings: Check for damage, loose fittings, and sharp kinks.
- Coolant hoses: Inspect for abrasion, leakage, secure connections, and adequate circulation.
- Controls: Check switches, remotes, plugs, and control cables for damage.
- Gas path: Confirm that gas reaches the assembled cup without obstruction.
If the tungsten contacts the work or molten pool, stop and remove it. Recondition or replace the contaminated section according to the electrode and equipment instructions before continuing.
Tungsten extension and shielding-gas flow depend on the cup, joint access, standard body or lens, electrode diameter, torch angle, material, and working environment. Use the procedure and equipment guidance for the actual setup instead of adopting one universal value.
Diagnose the component, not just the weld symptom
A weld symptom can point toward the torch, but it does not prove that the torch is the only cause. Follow the shortest path from symptom to component, correct visible damage first, and then widen the diagnosis to the gas supply, power source, work circuit, technique, and base material.
| Symptom | Likely torch-related checks | Next action |
|---|---|---|
| Porosity or poor shielding | Cup, seals, insulator, hose, fittings, gas passages, front-end match, drafts, angle, and coverage | Repair damage or correct setup before increasing flow |
| Tungsten slips | Electrode, collet, and body diameters; collet wear; back-cap tightening | Install matched parts and replace a distorted collet |
| Unstable arc | Tungsten contamination, collet grip, power connections, cable, and work circuit | Correct torch faults, then inspect the remaining circuit |
| Torch overheats | Model rating, duty cycle, cable, head, and coolant flow | Stop and correct the load or cooling fault |
| Gas leak | O-rings, insulator, hose, fittings, neck, and head | Shut off gas and repair under the manufacturer procedure |
| Coolant leak | Hoses, couplers, seals, neck, head, and cooler connections | Stop using the torch until repaired and tested |
For porosity or weak shielding, begin with the cup and gas path. Look for a cracked cup, damaged O-ring, incorrectly seated insulator, loose fitting, cut hose, obstructed passage, or mixed standard and gas-lens parts that do not seal correctly. Then consider drafts, torch angle, sudden torch movement, and whether the cup covers the joint.
For a slipping tungsten, confirm that the tungsten, collet, and body have the same specified diameter. Inspect the collet for distortion or loss of spring action, check the body’s tapered seat, and make sure the back cap tightens without bottoming on the wrong component.
For an unstable arc, inspect the tungsten for contamination and confirm firm collet grip. Check the torch’s electrical connections and cable for looseness, overheating, or internal damage. Then inspect the work-circuit connection and machine-side causes. A new cup will not correct a poor electrical connection.
If abnormal overheating appears, stop welding before insulation damage occurs. Confirm actual amperage and duty cycle against the torch rating, inspect the cable and head, and verify coolant circulation on a water-cooled system.
For a gas or coolant leak, shut down the affected supply and inspect the seals, fittings, hoses, neck, head, and cooler connections. Water leaks require prompt repair, and cables with damaged insulation should be removed from service. Replace cracked cups, worn collets, damaged seals, leaking hoses, and compromised cables according to condition rather than an invented calendar interval.
Buying checklist: bare torch, kit, or individual parts
Product names can conceal major differences in what is supplied. Identify the package type before comparing prices:
- Complete torch package: A configured torch with specified cables and connections. “Complete” means only what that seller lists.
- Consumables or starter kit: An assortment that may include cups, collets, collet bodies, a back cap, seals, or tungsten.
- Gas-lens kit: A matched conversion set that may include lens bodies, collets, cups, insulators, and related components.
- Machine hook-up kit: Adapters, connectors, fittings, or hoses used to join the torch to a power source or cooler.
Kit contents vary by manufacturer and seller. One kit may combine collets, bodies, cups, a back cap, and tungsten, while another includes only selected front-end components. As one seller-specific example, Arc-Zone states that some TIG torch packages omit front-end parts and machine connectors. That is not a universal exclusion: the actual included-items list controls.
Before ordering, verify:
- Exact torch model and consumable family
- Air- or water-cooled design
- Rated amperage and duty cycle
- Tungsten diameter
- Standard or gas-lens front end
- Collet-body, cup, insulator, and back-cap threads
- Required back-cap length
- Cable length
- One-piece, two-piece, or multi-hose cable configuration
- Machine-side power connector or adapter
- Shielding-gas fitting
- Control lead, plug, and supported remote functions
- Cooler capacity and connections
- Required coolant
- Every item included in the package
Do not assume that tungsten, cups, collets, adapters, connectors, controls, cables, hoses, or cooling equipment are included. These items are commonly organized into separate product categories; CK Worldwide, for example, separates consumables, cable connectors, cables and hoses, accessory kits, and remote controls.
Flexible heads, manual gas valves, trigger switches, and fingertip or remote amperage controls are model-specific options. They can change the mechanical layout, hose arrangement, control lead, or electrical interface.
Compare the seller’s included-items list with the current manuals for both the torch and power source. Catalog filters can narrow the choices, but they do not establish compatibility.
TIG torch components FAQ
Are TIG torch consumables universal?
No. Consumables are commonly grouped into families such as 9/20 and 17/18/26, but those labels do not guarantee cross-brand or cross-model interchangeability. Confirm the torch model, tungsten diameter, body and cup threads, insulator arrangement, and whether the front end uses a standard collet body or gas lens.
Is tungsten a consumable if TIG uses a non-consumable electrode?
Yes, in purchasing and maintenance terms. “Non-consumable” means the tungsten is not intentionally melted into the weld as filler metal. It can still erode, become contaminated, crack, or become too short after repeated grinding, so it requires condition-based replacement.
Can I run a water-cooled TIG torch without a cooler?
Not unless the manufacturer specifies another approved source of coolant circulation. A water-cooled torch depends on the required flow to remove heat from the torch and cable assembly. Stop if flow is lost or a leak appears, and follow the torch and cooling-system manuals before returning the equipment to service.
Use this five-step rule:
- Identify the exact torch model.
- Confirm the cooling type, amperage rating, and duty cycle.
- Match the tungsten diameter to the collet and standard or gas-lens body.
- Verify every thread, cable arrangement, fitting, control, and machine connection.
- Inspect seals, insulation, gas hoses, coolant hoses, and coolant flow before welding.
The current torch and power-source manuals—not appearance or family labels alone—are the final authority for fit, assembly, and service.