
Choose a TIG Welder With a Foot Pedal That Actually Controls Amperage
Check TIG foot-pedal compatibility, AC/DC capability, package contents and current limits, then troubleshoot missing or erratic amperage control.
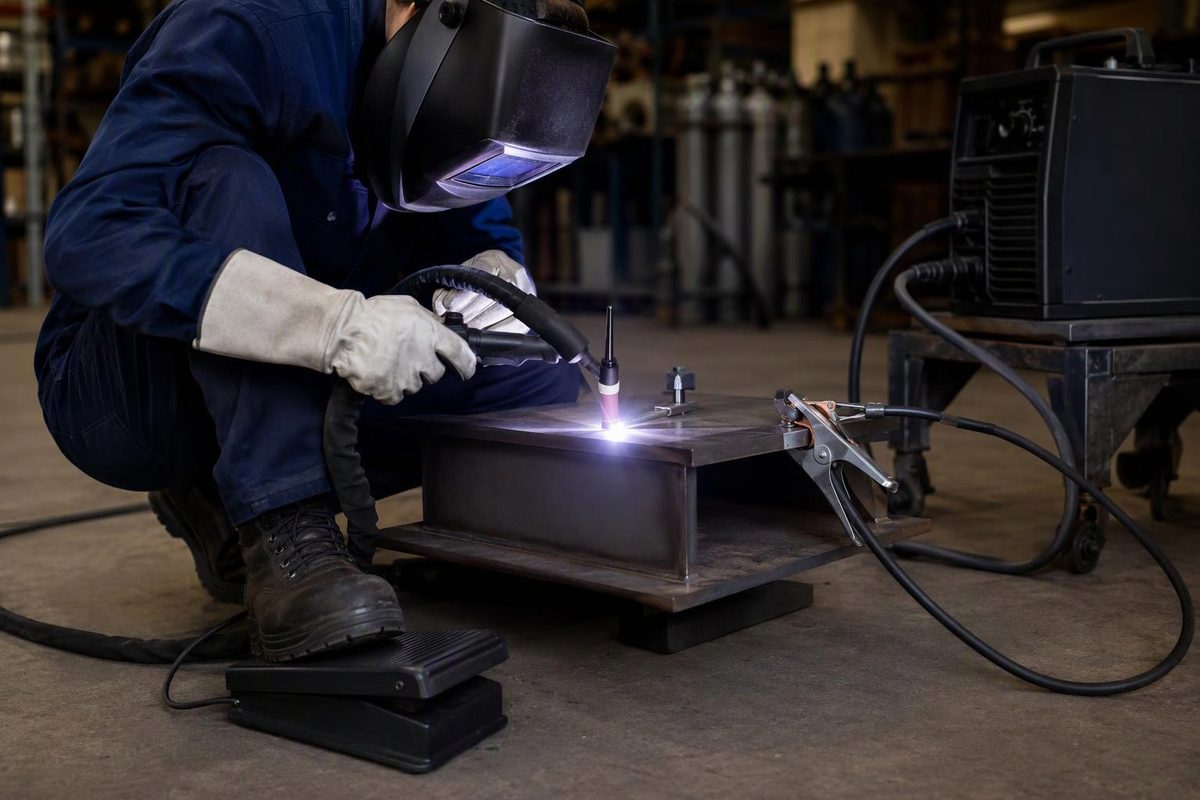
A TIG welder with a foot pedal needs variable remote-amperage control—not merely a TIG mode or a torch-switch socket. Before buying, confirm that the exact machine supports a pedal, that the pedal is electrically compatible, and that it is included in the package you are ordering.
For ordinary steel and stainless work, a DC TIG machine may meet the task. If conventional aluminum TIG is part of the plan, choose AC/DC TIG. AC provides oxide-cleaning action as well as welding heat; a pedal does not add that capability to a DC-only welder. PrimeWeld’s TIG instructions explain these material and current choices.
What the foot pedal controls
A variable TIG pedal lets you increase or decrease welding current while keeping both hands available for the torch and filler. Typically, initial pedal movement activates welding; further travel increases amperage up to a preset ceiling. The machine’s minimum output and remote-control design determine the bottom of that range. PrimeWeld’s remote-control instructions describe this operation.
That adjustment matters because the joint’s thermal condition changes during welding. Current that establishes a puddle on a cold joint may become excessive as the part warms or you approach an unsupported edge. Easing off the pedal lowers current without stopping to change the panel setting. It does not compensate for poor fit-up, contamination or unsuitable travel speed.
A pedal is most practical when you can maintain a stable stance or seated position. If the job requires frequent repositioning or leaves no reliable place for your foot, consider a compatible fingertip amperage control instead. Miller offers both types for the Maxstar 161. Its accessory specifications distinguish variable controls from an on/off-only remote.
The pedal and arc-start method are separate features. High-frequency start allows noncontact ignition; Lift-Arc requires the machine’s prescribed contact-and-lift sequence. Miller’s Maxstar 161 STH offers both methods, while its STL version offers Lift-Arc only. Both support remote amperage control. Miller’s March 2026 specification sheet distinguishes these capabilities.
Check these features before buying
| Check | What to verify |
|---|---|
| Material capability | DC TIG for the planned steel/stainless work; AC/DC TIG for conventional aluminum work. |
| Remote function | Variable current control, not just an on/off trigger input. |
| Pedal compatibility | Exact model and revision, approved pedal part number, connector, pin assignments and specified potentiometer resistance. |
| Input power | Available output on your supply voltage and circuit capacity—not just the largest number in the model name. Follow the manual’s supply requirements. |
| Low-current performance | Minimum TIG output and starting behavior suitable for your thin material. |
| Sustained output | Duty cycle at the working amperage, plus the torch’s rating and cooling requirements. |
| Package contents | Pedal, torch, regulator/flowmeter, gas hose, work lead and necessary adapters. Budget separately for shielding gas, filler and PPE. |
Matching the pin count is not enough. SSC Controls lists separate seven-pin Everlast pedals for machines requiring approximately 25 kΩ and 50 kΩ potentiometers. Its compatibility guide also distinguishes eight-pin RJ45 pedals that fit Miller Diversion machines from ones intended for other models. Order by an explicit compatibility listing, not plug appearance. SSC’s cross-reference guide provides those distinctions.
Two examples of different buying routes
These are specification-based examples, not a tested ranking. Package details were checked on October 1, 2026.
- AC/DC machine with a pedal included: PrimeWeld TIG225X. The manufacturer lists AC/DC TIG, high-frequency start, a foot-pedal amperage controller, regulator and gas hose. Torch model and cable length depend on the selected configuration. Verify the exact checkout contents and machine revision, particularly if choosing a water-cooled torch that needs a separate cooler. Current TIG225X listing.
- Portable DC machine with a pedal purchased separately: Miller Maxstar 161 STH. Miller lists DC TIG ranges of 5–130 A on 120 V and 5–160 A on 240 V, with a 13 lb power source. Those upper outputs require a suitable supply; voltage alone does not establish circuit adequacy. Standard package 907711 excludes the TIG torch, remote control and regulator/gas hose. The compatible RFCS-6M pedal is an accessory; package 907711001 includes a fingertip remote, not a pedal. Miller’s package, input-current and accessory specifications.
Shielding-gas selection remains a separate decision: see argon gas for TIG welding.
Set up the pedal without losing useful control
- Follow the exact machine manual for connection and mode selection. Do not copy another brand’s remote-activation sequence, or use instructions for a different revision. On the Maxstar 161, Remote Standard permits variable amperage control; Remote Hold uses panel-set amperage instead. Miller’s quick-reference guide.
- Set a deliberate maximum current. Use the applicable procedure or a starting point appropriate to material, thickness, joint and position, then verify it on representative scrap. Avoid setting the machine to maximum output simply because the pedal can reduce it.
- Check for a second limit on the pedal. Some pedals have their own maximum-current knob. UNIMIG’s example allows that knob to reduce the panel-set ceiling. UNIMIG’s pedal setup guide.
- Position it where your foot can move without disturbing the torch. Route the cord away from hot parts, sharp edges and wheels; damaged control cords can interrupt the connection. Miller’s foot-control guidance.
- Practice the finish as well as the start. Reduce current progressively, add filler as needed to fill the termination, and keep the torch shielding the weld through postflow. The pedal does not replace crater filling or gas coverage. PrimeWeld’s operating instructions describe reducing pedal pressure and holding the torch over the weld finish until gas flow stops.
For example, in non-pulsed TIG on a panel-limited system, a 100 A panel ceiling means full pedal travel commands no more than that ceiling. It is not a recommended weld setting, and half travel should not be assumed to deliver exactly 50 A.
If the pedal is not behaving correctly
Use these checks to narrow the problem, not to diagnose an internal electrical fault.
| Symptom | Check next |
|---|---|
| No activation | Correct TIG/remote mode, fully seated connector and exact pedal compatibility. |
| Arc starts, but current stays fixed | Panel/local control, trigger-hold mode, or an on/off-only remote rather than a variable pedal. |
| Full pedal gives too little current | Panel ceiling, pedal-mounted limit and output available on the connected supply. |
| Current jumps or cuts out | Visible cable damage, loose connector or a pedal that does not move smoothly. If external checks do not resolve it, seek qualified service. |
| Puddle grows despite steady pressure | Heat accumulation, slowing travel or changing joint conditions before blaming the pedal. |
Stop using damaged controls. Shut down before inspecting or reconnecting equipment as directed by its manual; electrical testing and repairs belong with qualified service personnel. Use welding PPE, ventilation and the required hot-work precautions even for a short pedal test. PrimeWeld’s safety and service instructions cover these hazards and restrict repairs to qualified technicians. For structural or pipe work, keep adjustments within the applicable procedure—smooth pedal control and an attractive bead do not establish weld acceptance.