
Welding Undercut Is an Unfilled Groove, Not Just an Ugly Toe
Identify welding undercut, trace likely causes, and decide whether the groove requires a settings change, measurement or approved repair.
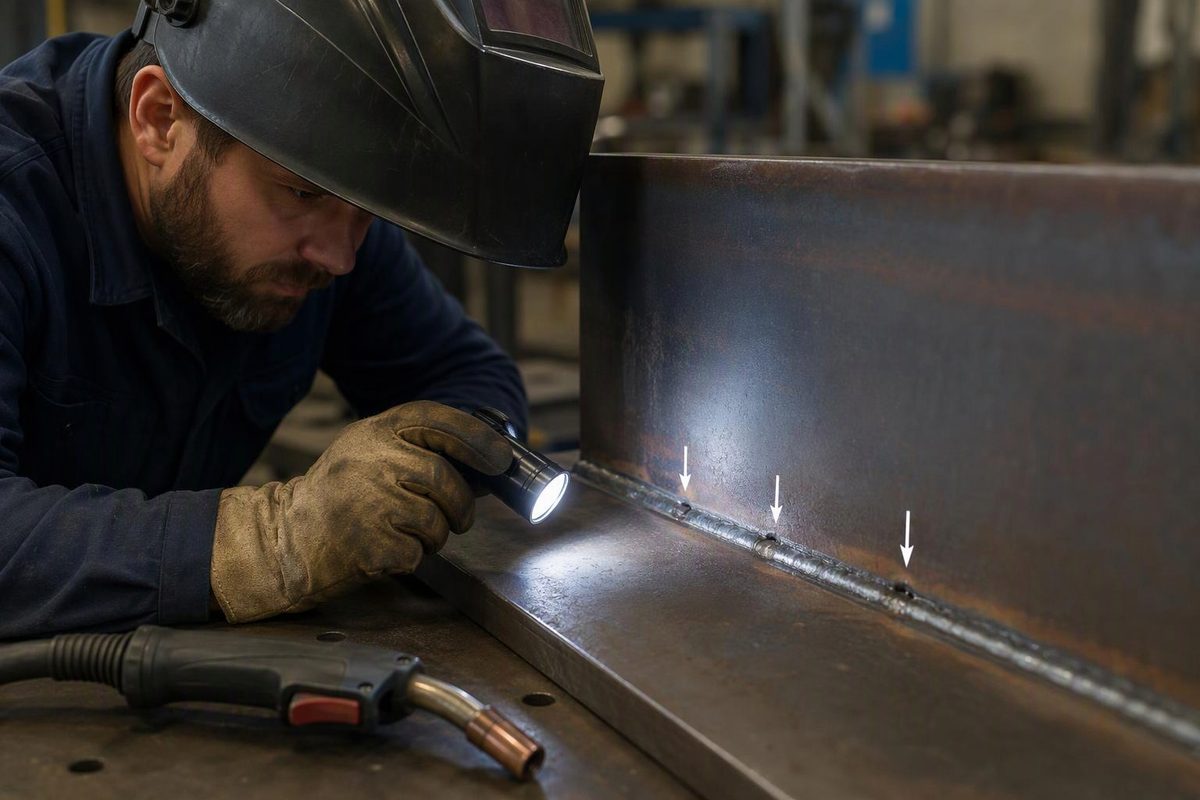
Welding undercut is a groove melted into the base metal beside the weld toe or root and left unfilled by weld metal. That is also the definition used in NASA’s general welding standard.
The arc has removed metal at the edge, but the puddle has not replaced it. The result is a local loss of section and a notch. A sharp groove can concentrate stress, making undercut particularly important on cyclically loaded parts; CWB shows an example of fatigue cracking that likely initiated at a weld toe with sharp undercut in its discussion of weld defects and their significance.
Undercut is not automatically rejectable, however. It is a weld imperfection or discontinuity until the applicable drawing, fabrication standard or contract criteria make it rejectable. Appearance alone cannot settle that question.
What undercut looks like
External undercut appears as a narrow channel running along one or both weld toes. Root undercut occurs beside the root and may not be visible from the face. On a horizontal fillet weld, poor angle or puddle control can leave a groove along the upper toe as the molten metal falls away from that edge.
Do not confuse undercut with:
- Underfill: The weld face or root surface as a whole is below the adjacent base-metal surface.
- Incomplete fusion: Weld metal has not fused to the base metal or an earlier bead. A smooth-looking toe can still conceal it.
- Overlap: Weld metal extends beyond the toe without fusing to the base metal.
- Grinding marks: These remove base metal mechanically rather than with the welding arc, although they may still be unacceptable.
Kobe Steel’s illustrated guide defines undercut as a groove at the toe or root left unfilled and separately classifies underfill and incomplete fusion, which helps when the visible profile is ambiguous (PDF). For a broader inspection sequence, see Bad Welding: Signs, Causes, Inspection, and Repair.
Why undercut forms
Several variables can produce the same groove because they all upset the balance between melting the edge and depositing enough metal to fill it.
| Likely cause | What happens at the puddle | Possible clues |
|---|---|---|
| Current too high | The edge melts faster and the puddle becomes difficult to control | Excessively fluid puddle, increased spatter or deeper-than-intended penetration |
| Voltage or arc length too high | The arc spreads and washes the toes without filling them | Wide, flat bead; long or wandering arc |
| Travel too fast | The arc advances faster than filler can fill behind it | Narrow or undersized bead, pointed ripples, underfill |
| Wrong work or travel angle | Arc force is concentrated on one edge | Undercut mainly on one toe |
| Poor weave timing | The arc melts each side but the puddle does not fill the toes | Grooves at both toes, often after a wide weave |
| Unstable arc or wire feed | Heat and deposition vary along the joint | Intermittent undercut and an irregular bead |
| Arc blow | The deflected arc attacks one side or changes near a joint end | Crooked or wandering bead and localized toe damage |
These are starting hypotheses, not instructions to change every control. Kobe Steel lists excessive amperage, fast manipulation, excessive arc length or voltage, and improper electrode angles among the principal causes. For stick welding, Miller likewise notes that a long arc can create undercut and that excessive travel speed may cause underfill or undercut (stick-welding technique guide).
GMAW adds another distinction: on a conventional constant-voltage setup, wire-feed speed strongly affects welding current, while voltage affects arc length and bead profile. Simply turning down “heat” without identifying the wrong control can trade undercut for a cold, convex bead. Lincoln notes that excessive GMAW voltage tends toward undercut and recommends checking manufacturer parameter guidance when correcting the setup (MIG problems and remedies). Worn tips, an incorrect liner or poor drive-roll adjustment can also disturb deposition; Miller identifies poor wire feeding as a possible source of undercut and poor toe fusion (rework guide).
Diagnose it in this order
- Find the governing requirement. Record the process, joint, position, material, filler and WPS or parameter chart. Do not apply a generic online depth limit to structural steel, pressure piping or production work.
- Clean and inspect the full length. Remove slag and spatter without erasing the original profile. Use adequate light, inspect both toes and check the accessible root. Mark where the groove starts, stops or changes sides.
- Measure rather than estimate. If acceptance depends on depth or accumulated length, use the inspection method and calibrated gauge required by the job. Also verify weld size because undercut can coexist with an undersized bead.
- Read the pattern. Continuous undercut on both sides points toward arc length, voltage, current, travel speed or weave timing. One-sided undercut points first toward work angle, tracking, gravity or arc blow. Intermittent damage suggests manipulation, wire feeding or an unstable arc.
- Verify the setup. Check the exact consumable, polarity, diameter, shielding gas where applicable, contact-tip-to-work distance, cable connections and machine settings against the WPS or manufacturer’s data.
- Watch the puddle on a representative coupon. Confirm that the arc stays near the leading edge and that the puddle reaches and fills each toe. Change one variable at a time while remaining within the approved range.
If the arc visibly wanders—especially near a joint end—treat arc blow as a separate fault rather than compensating with a larger weave. Lincoln says arc blow can contribute to undercut and lists corrective measures such as shortening the arc, reducing current where permitted, changing electrode angle or relocating the work connection (arc-blow guide).
Correct the process, not just the groove
For SMAW, confirm the electrode’s specified current range and polarity, then shorten an overlong arc. If the puddle is excessively fluid, reduce amperage in small steps within the permitted range. Correct the work angle and give the puddle enough time to fill each toe. A wide weave is not a universal cure; the procedure or consumable may restrict it. See Welding Patterns, but None Fits Every Weld.
For GMAW or FCAW, restore the approved relationship among wire-feed speed, voltage, travel speed and contact-tip-to-work distance. Check wire delivery before blaming hand motion. Track the joint consistently and correct the work angle if one toe is being washed away. Do not slow down indiscriminately: excessive slowing can place the arc back in the puddle and increase the risk of poor toe fusion.
For GTAW, shorten an excessive arc, reduce current if the edge is being washed away and coordinate travel with filler addition. Autogenous travel or delayed filler addition can melt a groove that the puddle never fills. Pulse settings or a change in pass sequence may improve control, but only where the procedure permits the change.
In vertical or horizontal welding, account for gravity rather than trying to overpower it. Use an angle that maintains both toes, choose a narrower pass when appropriate and pause long enough to fill the edge without continuing to melt it away.
Acceptance and repair
There is no universal “allowable undercut” number. Limits vary with the governing standard, material thickness, joint type, loading and service. For example, ISO 5817:2023 establishes quality levels B, C and D for specified fusion-welded joints in steel, nickel, titanium and their alloys; it does not serve as a universal criterion for every weld. AWS and other organizations publish application-specific codes. The applicable edition, contract documents and approved engineering criteria control.
If the groove is within those criteria, document it as required and do not introduce needless repair heat. If it is rejectable, follow the approved repair disposition. That may involve grinding or excavating to sound metal, cleaning, depositing a qualified repair weld and repeating the required inspection. A casual wash pass can conceal the original groove without ensuring fusion, while grinding alone may reduce the section further.
Correct the cause before making the repair. Otherwise, the repair bead can reproduce the undercut—or replace a visible toe groove with a less visible fusion problem. A repaired weld is acceptable only after the specified inspection confirms it, not because the toe looks smooth.